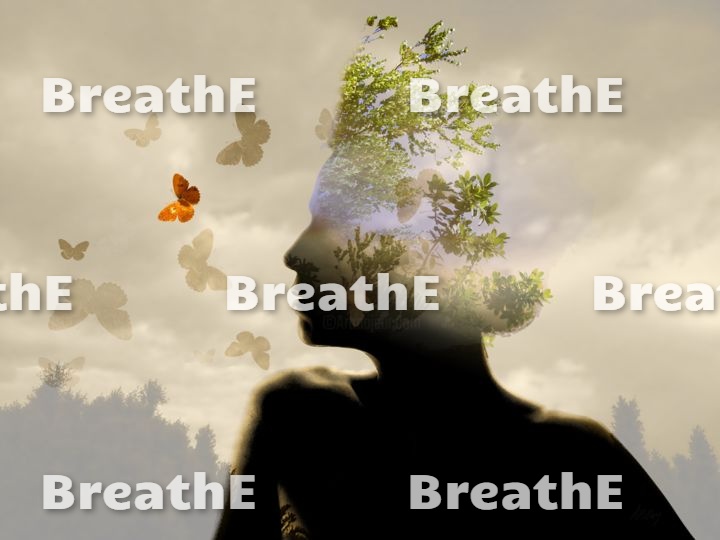
It is astonishing to me how many people have gone through their entire adult lives breathing primarily through their mouths. The harm that chronic mouth-breathing causes the body and mind is so extensive and well-documented that correcting this one single issue can lead to a dramatic improvement in overall well-being.
Within the Path of Yoga, we find a vast system of Breath Control, called Pranayama in Sanskrit. Pranayama is a comprehensive and elaborate system of breathing techniques aimed at bringing about various changes in our nervous system state. There are restorative techniques to calm us down and harmonize our stress levels and other techniques to fire us up and prepare for physical challenges. There are techniques to quieten the mind, to improve sleep, as well as those that stimulate digestion, hone the attention and improve memory. And yet the entire system of Pranayama assumes, as a general rule, that the person is breathing through their nose, and not through their mouth. In yoga you will often hear the nose is for breathing; the mouth is for eating. And for very good reasons as you will see.
As a Certified Breath Coach, one of the most satisfying interventions is when I can help my clients to break the habit of chronic mouth-breathing, because the improvements that people see are so startling. Some of the problems associated with chronic mouth breathing include:
Lowered immune defense
Dental cavities and over-crowded teeth
Erectile dyfunction
Bad breath
Dry cough
Asthma
Slack jaw
Baggy eyes
Poor sleep
Sleep apnea (breathing that stops and starts during sleep)
Poor digestion
Reduced cognitive function
Concentration and memory problems
Stress and anxiety
Fatigue
Our nose is an extraordinary and under-appreciated organ. Rhinology is a fast-growing scientific discipline which has exploded in recent years through a deeper understanding of the complex functions of the nose and the paranasal sinuses and their impact on our health. The nose is our first line of defense against infection, colds, flu, allergies and hay fever since our nasal passages filter out coarse particles including bacteria, viruses and fungal spores. It is worth noting that 96% of all chronic rhinosinusitis is believed to be fungal.
The nose also acts as an air sterilizer, neutralizing pathogens though the release of Nitric Oxide (NO) that is stimulated through nasal breathing, particularly the inhalation. We are only just beginning to understand the benefits of Nitric Oxide. We know that it dilates the blood vessels and helps the heart to function properly by lowering blood pressure. But NO has also been discovered to be the main signalling molecule in penile erection and its deficiency can lead to erectile dysfunction.
Our nose also helps our lungs to function properly. Nose breathing stimulates the movement of lung cilia which protect our lungs against intruder cells, and reducing mucous and pathogens. The lungs function best when the air is at body temperature and 100% humidity, so the nasal passages help to moisturize and warm the air that we breathe. There is a lot more that I could add and if you’re interested I encourage you to look into it further.
In time, chronic mouth breathing shuts down the proper function of the nose so that it becomes ‘blocked’. What often surprises people is that when they begin to use their nose again, it starts to open up. It is really a case of ‘use it or lose it’.
The good news is that even if you have been mouth-breathing for decades it is possible to ‘wake up’ the nose and learn to breathe as nature intended. It won’t happen overnight, but with proper guidance and practice most people find significant improvement in as little as one week.
To learn more and for information on private and group yoga sessions/breath coaching contact me at: lavieenyoga@gmail.com
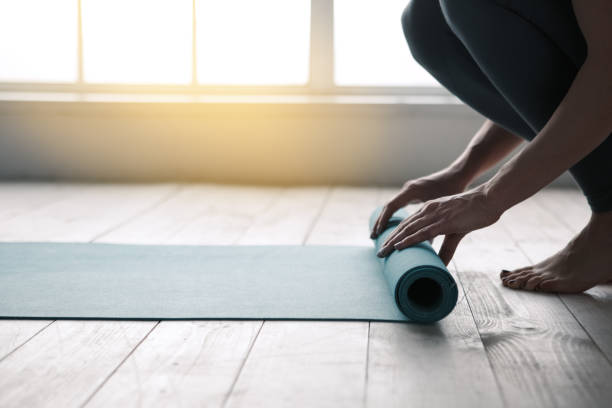
You know the drill. It’s a sunny day. Miracle of miracles. And you can’t wait to get your gardening togs on and go out and attack those weeds, that with all the rain we’ve been getting are almost as tall as you are. But hold on just a minute. Remember last time you spent 6 hours in the garden and woke up with your back seized up? No, of course not, because this is a brand-new day and just look, those weeeeds!
We can often forget that gardening is a workout for the body and especially for our backs. So here are 10 tips to stop your back getting ugly while you beautify your garden.
Wait at least 1 hour after you get up before you begin gardening. This is because the back is more vulnerable to injury first thing in the morning due to build up of fluid in the discs during the night which compresses out during the day.
Because gardening mostly involves bending forward, do a few counter postures before you begin that involve arching the back like cat/cow, cobra or sphinx, or simply standing arms arm and leaning back a little.
When you get out into the garden, whether you are standing or on all fours, don’t hunch your back when you lean forward. Bend from your hips, keeping your back straight. If you follow the rule of not dropping your heard down this will help maintain good back alignment. Rounding the back while leaning forward puts enormous stress on the spine, so if you only follow one of these tips, follow this one.
Get into the habit of every 20-30 minutes, in a standing position, putting your hands on your lower back and arching backwards a little. You can set a timer to remind you.
Try not to twist your back to the side as you work, move the whole body instead if you need to turn around. Twisting puts a lot of pressure on the spine.
Gardening often involves some heavy lifting. Always remember to hinge down from the hips and plant the legs firmly, lifting the weight close to the body and using the strength in your arms and legs.
If you’re raking, shovelling or watering with a hose, use a nice wide stance with feet firmly planted, torso straight, and use your legs to shift position, rather than leaning.
Anything strenuous like shovelling that revolves repetitive strain remember to engage your glutes (squeeze your butt) and your core muscles. This will help to support the spine as you work.
Build up garden work gradually. Don’t go from 0 to 6 hours. Begin with one hour, then two, and build up the time so your body gets a chance to adapt. You will be in much less danger of hurting yourself.
Don’t forget to take the time to smell the roses! A 5-10 minute break every hour will help to ensure that your roses are not neglected because you’re laid up with back pain.
Feel free to get creative in how you support your back using these tips as a guide. It’s hard to change old habits, but if you continue to remind yourself to adopt protective postures as you weed, plant, shovel, water and rake, soon it will become second nature. Your garden will thrive and your back will survive!
To learn about group and private classes (off and online) for yoga and breath coaching please email me at: lavieenyoga@gmail.com
In our more recent classes, we have been working on creating our own personal mini yoga sequences. It has been a lot of fun and it’s always so interesting to see the different choices that people make and how different we all are. For one person, the downward dog pose feels like an easy-going pal – a posture they happily hang out with – but for someone else, downward dog feels like their ‘bête noire’ – a posture they would rather not hang out with at all!
I thought I would share some of the things that we have learned during these sessions so that you can put together your own yoga sequence at home. If you’re a yoga teacher doing this in a class setting then I highly recommend that you have your clients/ students do this exercise in pairs, with each person developing their own sequence but collaborating on the process itself. For one thing, having an extra person there helps when it comes to weighing the options as to which pose to do next. It also helps in memorizing the sequences. One person might forget their second posture, for example, but their partner might well remember it. It also makes it a more dynamically creative process because people can bounce ideas and thoughts off one another. When it comes to planning and performing your sequence in front of the class, it’s also less pressure and more lighthearted when there are two of you.
No matter whether you are creating a sequence with a partner or on your own, I suggest that you begin with 4 postures. This may not sound like many, but bear in mind that Salute to the Sun (Surya Namaskar) constitutes of only 4 main poses. The rest are simply repetitions, either repeated on the same side, or on the other. You can always expand on your sequence later on by adding transitional postures and movements in between the key postures or by adding extra poses at the beginning and end.
So, what criteria should you use to decide on your postures since there are so many to choose from?
One way to categorize yoga postures is by your orientation to the ground. We have standing postures; mid-level postures, seated postures, front to ground postures, back to ground postures and four points postures (hands and knees/feet).
Standing postures include: Warrior Pose (I,II & III), Triangle Pose, Palm Tree Pose, Tree Pose, Forward Bend, Goddess Pose Mid-way postures include: Low Lunge, Lizard Pose, Camel Pose, Patient Crane Pose, Bird Dog Seated postures include: Boat Pose, Seated Spinal Twist, Staff Pose, Butterfly Pose, Churning the Butter Four-Points Postures include: Plank, Table, Downward Dog, Frog Pose Front to ground postures include: Sphinx Pose, Cobra, Crocodile Pose, Bow Pose, Hare Pose, Threading the Needle Back to ground postures include: Shoulder Stand, Universal Spinal Twist, Bridge Pose, Rocking the Baby, Fish Pose, Corpse Pose
Here are 9 tips to building your own bespoke yoga sequence.
.Create a sequence with postures from at least 3 of the levels listed above, moving from a standing pose downwards. For example, you could choose two standing poses, one four-point pose and one front ground pose.
Begin by choosing postures that are the most familiar to your body. You can always add postures that feel more advance to you later on.
Choose one posture in your sequence that is a bit of a bête noire for you. The reason for this is that the postures we find the most demanding are almost always the postures that we learn from the most. You don’t want to overdo this and have all the postures be ones your body struggles with or else practicing your sequence won’t be much fun, but 1 in 4 should be manageable.
Create as much fluidity and conservation of movement as possible between one posture and the next. For example, shifting from Warrior Pose directly into Hare Pose is cumbersome unless you include a transitional pose such as Downward Dog.
The length of time you stay in any posture is up to you but try to stay in each posture for at least 10 and up to 20 seconds.
Once you have chosen your 4 postures, begin to practice them every day.
People often struggle to remember their sequence. A good memory trick is to create a ‘story’ with your postures. For example, Tree Pose to Warrior II to Downward Dog to Hare Pose could become The Tree shaded The Warrior while his trusted companion Downward Dog chased a Hare through the woods.
Once you have become familiar with your sequence, begin to repeat the ‘double-sided’ postures, meaning that allow for the same postures on the other side. Take the above sequence, for example. You can do Tree Pose starting with the left leg up, then shift into Warrior II with left leg behind you, then into Downward Dog and lastly into Hare Pose. You could then return to Downward Dog, move back up into Warrior II except this time with the right leg behind you (perhaps first transitioning from Downward Dog through high lunge) and then back into Tree Pose with the right leg up.
Feel free to get creative and make your practice truly your own!
This is the second in the series Recruiting the Vagus Nerve: the best friend you didn’t know you had.
Self-distancing is a powerful intervention – some people call them hacks or manoeuvres – to recruit the Vagus Nerve, that wonderful friendly nerve that controls the relaxation response of our Autonomic Nervous System. This is the tend and befriend ground or circuit of safety and connection. When we activate the vagal pathways of the Parasympathetic System, we reduce stress, anxiety and anger, as well as reducing lethargy, low motivation, and inflammation. We improve immune response, breathing, cardiac health, digestion, and lots more. The activity of the Vagus Nerve is measured as vagal tone, so the better we get at recruiting the Vagus Nerve the more we improve what our ‘vagal tone’. You can think of it as a singer toning the voice.
These interventions that target the Vagus Nerve also do something quite remarkable and unexpected – they reduce egocentric bias, that is, the tendency to over-emphasize our own personal view and experience at the expense of a broader perspective. Vagus Nerve activity reduces our tendency to over-analyze and ruminate on our emotions and reactions, hopes and fears. The Vagus Nerve helps us to be less self-conscious, which is always a liberating trend.
A number of scientific research studies have shown that techniques that involve a practice called self-distancing actually reduce this egocentric bias and improve vagal tone – our ability to self-regulate through recruiting the Vagus Nerve.
What is ‘self-distancing’? Self-distancing is developing an observer part of our consciousness.It’s getting out of our story – of predictions or fantasies about the future, if I do this then this might happen. Equally, it releases us from raking over the past which often keeps us trapped in negative thought-loops or obsessive nostalgia. Self-distancing is the opposite of self-immersion. Self-immersion always keeps us from experiencing the present moment because it involves thinking about the self instead of being the self.
According to research, when people adopt a self-distanced perspective while discussing a past difficult event or imagining a difficult future event, they make better sense of their reactions, experience less emotional distress, and display fewer physiological signs of stress, which is reflected in healthier cardiovascular activity. They also experience reduced reactivity when remembering the same problematic event weeks or months later, and they are less vulnerable to recurring thoughts (or rumination).
You can do this consciously, but this tendency can also begin to emerge as a side-effect of mindfulness and yoga techniques which train us to practice observing the body.
TECHNIQUES FOR SELF DISTANCING:
In one study, participants were put into one of three groups. One group performed a traditional “expressive writing” task, with instructions to wear their heart on their sleeve and write freely about their “strongest and deepest emotions.” Another group was told to engage in “narrative expressive writing”, in which they created a “coherent and organized narrative” of their marital separation with a storyline arc with a beginning, middle, and end. The third group given an emotionally neutral writing task. Participants assigned to the “narrative expressive writing” group showed the greatest reduction in cardiovascular markers for stress as well as an increase in heart rate variability (HRV). They found that people who had the best results used the question what instead of why did because why questions encourage a lot of fantasizing.
TAKE THE PERSPECTIVE OF AN OBSERVER: It’s hard to stop this mental chatter altogether, so a technique that people have found useful is to imagine a stressful future or past event like a fly on the wall. This is a step towards developing what is called ‘witness consciousness’ in yogic traditions or ‘observer consciousness’. A number of studies have shown that people feel less anxious when they imagine a future stressful event – like public speaking or an upcoming interview – as an outside observer.
USE THE THIRD PERSON WHEN SELF-REFERENCING: Saying your name out loud, or even in your head, when self-referencing can have the effect of encouraging a less emotional response to events. If you’re have a tough day getting motivated, you can talk yourself through the steps you need to take – like getting in the shower, making breakfast, and so on as if you are your own coach. You can even give yourself encouragement, like “Don’t worry, you can do this.” Positive self-talk in the third person can help to transform negative thoughtform loops by replacing self-criticism with self-care. In other words, we talk to ourselves the way we would talk to a friend.
NARRATIVE EXPRESSIVE JOURNALINGResearch shows that just 20 minutes of “narrative expressive writing” over a three day period can trigger a physiological chain reaction that was found to improve Heart Rate Variability (HRV), which is the measurement of variations within beat-to-beat intervals that indicates cardiovascular health and is how vagal tone is measured.
Self-distancing helps us to maintain that BIG PICTURE – viewing our prospects from a third-person perspective helps us to notice things that we might easily miss when we’re all tangled up with it. We miss the wood for the trees, as it were. Self-distancing helps us to be MORE OBJECTIVE which in turn, helps us to take things less personally. And perhaps the greatest gift of self-distancing is the effect of SELF-FRIENDING. Developing this observer self brings in a kinder and less judgmental point of view. It is often easier to have a calm and wise perspective on a friend’s problems but less easy to have that same perspective towards our own.
With the gentle art of self-distancing, we can finally be that friend to ourselves that we try to be for others.
One Sunday morning, I got up out of bed and felt a groaning ache radiating from my lumbar region, around the hips and down the outside of my left thigh. Fast forward to ten days later, and I am now an ecstatic 90% better! I’m writing this blog post to let you know how I self-diagnosed my problem and learned to heal in only 10 days.
Youtube is an amazing resource for back problems. A heartfelt thank you goes to Dr. Brant Peterson, a sports chiropractor at Positive Motion Chiropratric, for sharing the information that helped me the most to get through this. The bonus was that I was able to help to pass his advice on to my friend Steven who had, coincidentally, been suffering from the same debilitating condition for several months. Months?? I could barely handle a week! But I’m a wimp when it comes to pain and being a bit of a yoga geek, I also love to research problems.
SO WHAT WAS THE PROBLEM?
Turns out I was suffering from an often-undiagnosed condition called SACROILIAC JOINT (SIJ) INSTABILITY. SIJ issues are tricky to diagnose. The problem is often missed on an x-ray, CT scan or MRI even though SIJ issues cause up to 15% of lower back problems. And it is not something that can be fixed with an ‘adjustment’, which will offer temporary relief at best and might well make the condition worse. This is because the problem is not that the joint is too fixed or rigid but that it is TOO UNSTABLE.
There is a (controversial) process of diagnosis that involves injecting an anesthetic into the joint but you obviously need a medical professional for that. Also, there are many other conditions that can mimic the symptoms of SIJ problems such as a herniated disc, spinal stenosis, osteoarthritis or bursitis of the hip. The good news is that this problem responds very quickly to some very simple interventions.
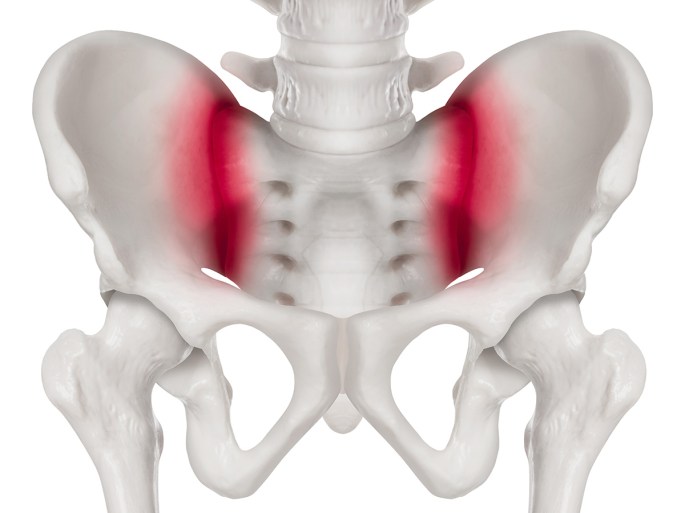
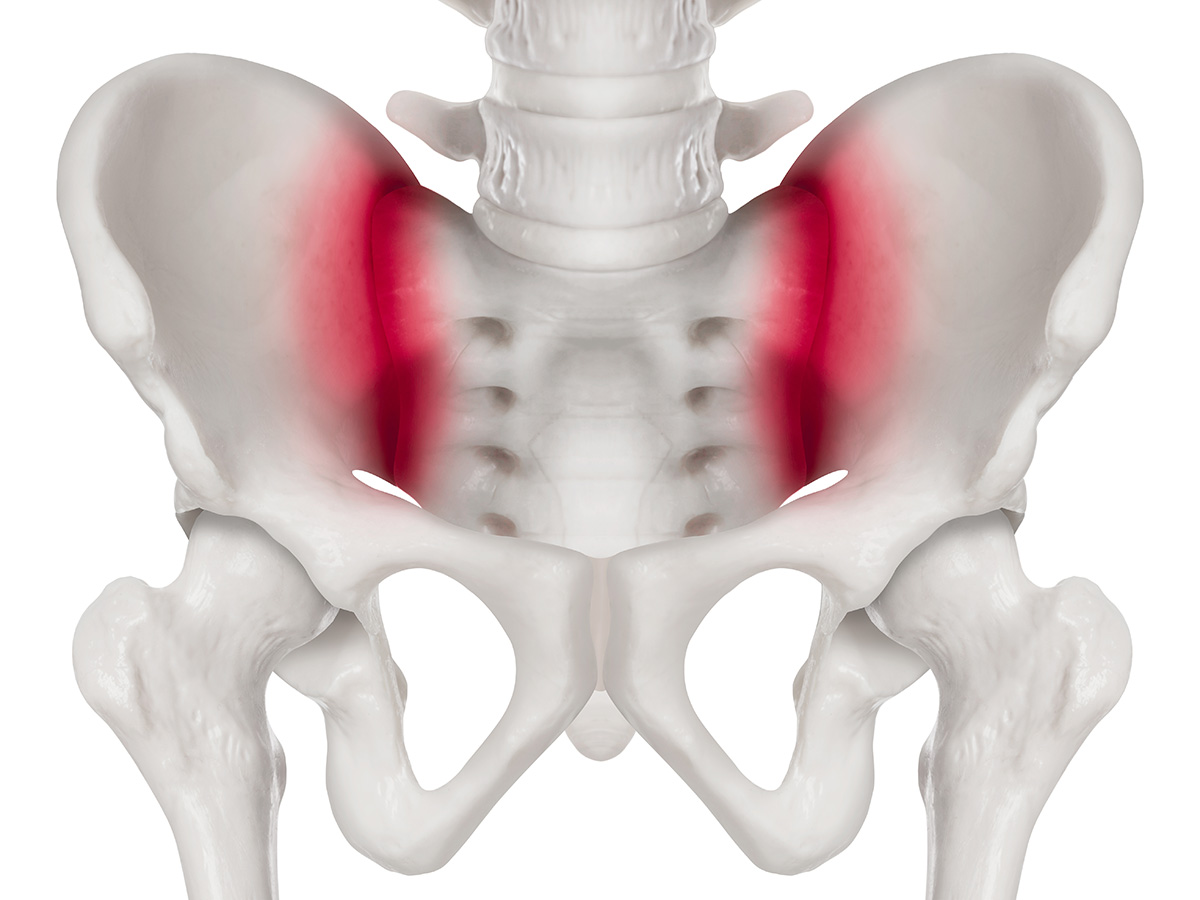
SO WHAT IS THE SACROILIAC JOINT?
I always started to nod off in anatomy class. Nothing like a personal injury to get you fascinated by the subject! The SI joints lie between the sacrum and the ilia (singular: ilium) bones of the pelvis – hence the name sacroiliac joint.
The ilea are basically the hip bones, the large ones that look like the ears of an elephant. The joint we’re talking about connects the elephant ears of the hip bones to the sacrum at the base of the spine. The sacrum is a bony structure that looks like a shield from Game of Thrones. It’s located just above the tail bone at the base of the lumbar vertebrae, which itself is connected to the pelvis. Remember, everything is connected.
These joints carry the entire weight of the body, so the ligaments that connect need to be super strong and stable. In fact, they are the strongest ligaments in the whole body. The joints they attach to act as SHOCK ABSORBERS, protecting from stress on the pelvis and spine, and they are key to LOAD TRANSFER from the upper to lower body when upright.
WHAT IS SACROILIAC JOINT INSTABILITY?
SIJ instability occurs when the ligaments that connect these joints get stretched from overuse or trauma. Dr. Dan Tuttle explains: The joint becomes hyper-mobile. In an attempt to stabilize the joint, the body will activate a multitude of muscles and people will experience this as a multitude of symptoms. Since the SI joints are so key to stabilizing the body, when they are not working properly, the whole system can get out of whack.
WHAT DOES SIJ INSTABILITY FEEL LIKE?
For me it felt like my body was being slowly crushed from both ends. It was a dull, grinding kind of pain. But it’s not always just around lower back. The pain can be felt in the hips, the buttocks, where the hips and thighs meet at the front of the body, down the side of the thighs, even around the shoulders and neck. If left untreated, it can even lead to sciatica. Since there are so many muscles from the rest of the body that attach to the pelvis (being able to run away is of paramount importance to survival) SIJ PAIN CAN TRANSFER ALMOST ANYWHERE, including the neck and shoulders. It can even cause headaches, which it did for me.
Some people can pin-point a very specific area as the central point of the pain region. This is classically on one side of the rear-most point of the pelvic bone above the buttock, a couple of inches to the side of the centre line of the upper sacrum. It can be felt as a small bony protrusion.
Pain sucks our milkshake dry. Leaving us tired, grumpy, restricted, and vulnerable to more injury. The pain of SIJ instability can be dull and throbbing, but it can also be sharp and stabbing. The back can feel tight or stiff. The pain can come on suddenly or creep up over time. Mine was always worse in the mornings and improved throughout the day and then got worse again in the evening.
WHAT CAUSES SIJ INSTABILITY?
Trauma to the area can be caused in several ways, often from a simple motion that combines bending forward, tilting the pelvis and twisting the torso. Steven knows exactly when his trauma occurred. He was on a ladder fixing a roof and he twisted around while carrying some tiles, combing classic SIJ damaging moves.
One common trigger is misjudging a step down and banging the heel heavily causing a sudden, hard impact. Activities where this impact is repetitive, such as tobogganing can also be culprits. SIJ problems can affect women in late-stage pregnancy, where the weight is being carried forward, and people like myself who have one leg a different length to the other are more prone to this problem. (It was due to a motorcycle accident in my more exciting youth). And, like everything, you need to take care of this area more as you get older. I’ve always had a really strong back, but at 58, this was a wake up call to pay more attention.
In my case, I’m pretty sure that I destabilized my SIJ while leaning forward while pouring large plastic bottles of kerosene into my kerosene heater container. I could tell at the time this was not a very smart position and a couple of times my back felt tweaked afterwards, but I didn’t think much of it because the pain didn’t last very long. But this winter, when I was filling my kerosene heater almost every day, it was a step too far. Needless to say, I now use the hand pump when filling the bottles. Takes twice as long, but it’s well worth the wait!
WHAT MAKE SIJ ISSUES WORSE?
Some activities that can feel really bad when you have this condition are: prolonged sitting or standing, walking upstairs, turning in bed, leaning forward, twisting.
YOGA POSES to avoid with SIJ ISSUES
Here’s a red list of yoga poses for SIJ issues. All forward bends, especially asymmetric bends and/or those where the legs are wide like Upavistha Konasana; all side bends. Also problematic: Extended Triangle Pose (Utthita Trikonasana); Extended Side Angle Pose (Utthita Parsvakonasana); all postures that spread the thighs wide apart (abducted poses) such as Warrior II (Virabhadrasana II) and Baddha Konasana; and spinal twists such as Marichyasana III as well as any side bends. Janu Sirasana is one of the worst since it combines all the moves known to aggravate this condition: twisting, abduction, and forward bending. There’s a very informative article in the Yoga Journal that goes into all of this and more.
Many of these red list poses were included in my daily practice. I was doing warrior like it was going out of style as well as lots of forward bends and extended side bends. Looks like I’ll have to create another practice sequence for a while. A good opportunity to change the routine.
YOGA POSES THAT HELP
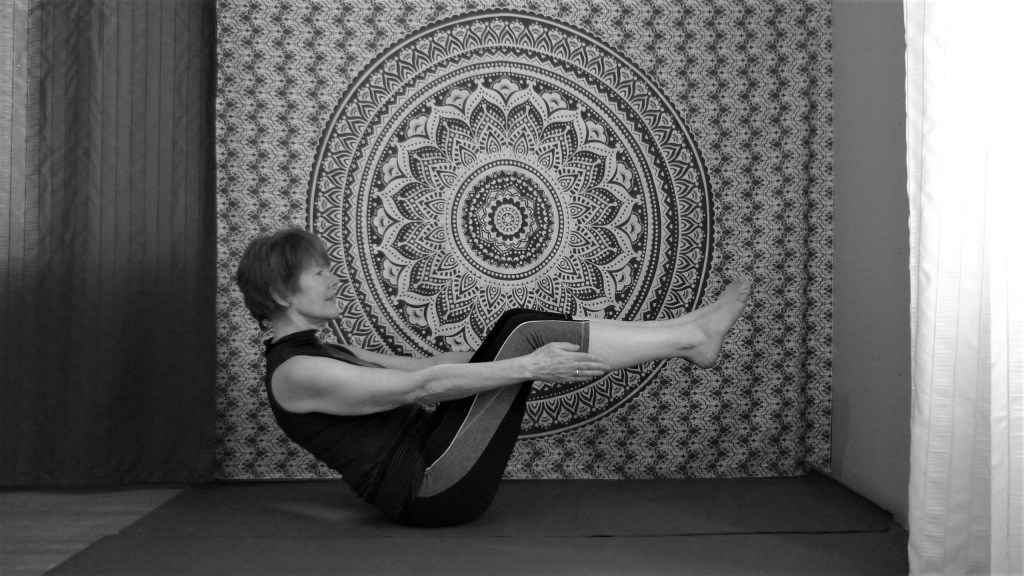
Many sites that claim to show helpful poses for this condition include poses that actually AGGRAVATED my SIJ instability. The two poses that I CAN recommend without hesitation are: Boat Pose (Navasana) and Bridge Pose (Setu Bandha Sarvangasana). I’d love to hear from anyone who has helpful suggestions based on experience rather than speculation. However, there are a LOT of EXERCISES that CAN help, as you’ll see.
Boat Pose is a good yoga pose for SIJ issues
WHAT ARE THE BEST INTERVENTIONS FOR sij ISSUES?
There are 4 main interventions that worked like a charm for me.
REST
SIJ SPECIFIC EXERCISES
TARGETED COLD WATER THERAPY
SACROILIAC BELT
I also took 400 mg of ibuprofen once a day for the first 3 days. It seemed to help the muscles to relax and be more responsive to the exercises.
REST REST REST
Learn from Wise Rest Dog
As Dr. Dan Tuttle points out, physical therapists tend to think in terms of mobilization for resolving joint and muscle issues, when actually what this joint needs is to be STABILIZED—in other words held together better. This is why REST can be so important. I don’t mean bed rest. But actually, stopping your daily routine for a while – and certainly stopping the movements that could have caused or exacerbated the condition like lifting weight, especially while turning, twisting, bending forward, etc. Rest can be one of the toughest things for bodywork enthusiasts to do, but you need to take time to reset, figure out what you’ve been doing that has caused this problem to arise, and give your body a break from all unnecessary stress. I stopped all yoga and my 1 hour daily walks for a week. Walking on flat ground for up to 15 minutes is fine though. You can start the suggested exercises right away, since they address the problem instead of exacerbating it.
SIJ SPECIFIC EXERCISES
Most importantly of all DON’T’ STRETCH! I know it feels like this is what you need, but it’s not. My friend who didn’t know that he had SIJ instability, kept coming to me for private yoga lessons for his back pain. Sometimes he would get temporary relief, but that was the rub. It was always only temporary. There are specific exercises that can radically improve your SI joint stability, but they do NOT involve stretching. They involve horizontal hip-stacked leg lifts, clamshell exercises, core work and isometrics.
Dr. Brant Pederson of Positive Motion Chiropractic has some very helpful exercises here.
Dr. Joe DeMarco of OcraMed Health has some cool core-building exercises designed especially for people with SI joint issues.
My SI joint healing routine (morning and evening) involved 3 rounds of 10 the horizontal leg lifts, 20 or so clamshells each side, and a couple of isometric exercises. The key to the horizontal leg lifts is to STACK THE HIPS and even to roll the top hip slightly forward. If it’s hard, you’re probably doing it right. Later, I included Dr. Joe DeMarco’s knee-raised crawl which was fun as well as stabilizing. How I love that word – stabilizing.
TARGETED COLD WATER THERAPY
Cold water is a natural pain reliever. Cold water causes the blood vessels to restrict, reducing blood flow and so bringing down swelling and inflammation.
Cold water is a natural pain reliever
Since cold therapy has several other benefits, I normally take a 3-4 minute cold rinse after my hot shower every morning, so staying in a bit longer to target my SI joints wasn’t a big deal for me. I know that many people have a huge aversion to cold water (as did I before I got used to it) but it has an amazing effect on pain. After my hot shower, I use the spray nozzle for 1 minute I on my front pelvic region, 1 minute each on my hips and 1 minute on my lower back. It is simply AMAZING how good this feels afterwards.
SACROILIAC BELT – MY NEW BEST FRIEND
When I put on my sacroiliac belt my first feeling was – gratitude and relief. It just feels so, so good, like this is EXACTLY what my body needed. “I can finally start to heal” Steven texted after the first day of trying it out. The belt costs about 30 USD. You can run a test by tying a scarf or any long narrow material around your hips. If this feels good, then a sacroiliac belt might be what you need. You can hide the belt under clothes but I tend to wear mine on top. It feels a bit action hero, like it should be hung with high tech weaponry. I might never take it off.
Here’s a video from the wonderful Dr. Brant Pederson on how to wear it, because it’s a bit tricky. It needs to be below worn on the hip to be effective.
OTHER SIJ INTERVENTIONS
There are more extreme interventions such as SI joint fusion – a surgical procedure that involves placing a bone graft over the joint with screws and rods to keep it in place as it grows. There’s only about a 50% success rate though and spinal surgery seems an extreme and risky option.
There are also SUPPLEMENTS that help some people. Dr. Pederson recommends a product called Ligaplex 1. Glucosamine and Chondroitin formulas are also said to help, especially if your SIJ problem is linked to other underlying issues. I encourage you to work with your own chiropractor or health professional for proper diagnosis and resolution.
I hope that you found this helpful and are soon pain free.
And as always, respect yourself, explore yourself.
I love this little meditation. I first learned it from a teacher in Varanasi, India. I love that it is that it is so simple, so universal ,and doesn’t require any philosophical preparation or cultural trappings. The visualization exercise doesn’t require you to be an accomplished meditator or engage in a lot of mental gymnastics. It is very gentle – exactly the gentleness that it encourages in ourselves. You only need a mind and a body and 5 minutes of time. I find that shorter meditations can be very effective, especially for us beginners
This meditation helps us to accept ourselves as we are, without judgement. When we treat ourselves with respect and acceptance, we find that we respect and accept others more easily. It’s a truly magical formula! Tell your inner critic to take a holiday and enjoy this beautiful act of self-friendship.
1. Sit comfortably on a chair or on a cushion on the floor. Take a moment to observe your body and adjust your position if need be. Slow down your rate of breathing a little, extending and refining the inhalation and the exhalation, breathing only through the nose if you can.
2. Mentally scan your body starting from the feet and moving upwards, relaxing any muscles that you discover are tense, all the way up to the head. Feel the connection between your body and what you are sitting on. Relax the stomach and bring the breath more into the stomach, noticing how it rises and falls with each inhalation and exhalation.
3. Close your eyes and imagine that in front of you is a full-length mirror. See your reflection in that mirror, just as you are right now, with the same clothes. Take a minute or so to really stabilize this image of your own reflection in your mind.
4. Mentally offer a greeting to this mirror-self, with a sense of goodwill, understanding and encouragement. Feel these sentiments around your heart, like a warm energy, and continue to offer these positive feelings to your mirror self. Gently lift the corners of your lips into a half smile. Do this for a few minutes, returning to the visualization every time your mind wanders off, which it most probably will! Gently bring your attention back to the visualization (without berating yourself for wandering off to the garden or your plans for the day or wherever it went), and continue to extend these feelings of warmth and good will to your mirror self.
5. Now feel that your mirror self has fully accepted these sentiments with appreciation.
6. Then imagine that the mirror dissolves leaving only the mirror self which then merges into you and dissolves into the area around your heart. Feel that all these sentiments are now operating beautifully inside you. Warmth, goodwill, understand and encouragement. Sit for a while, bathed in all these good feelings.
Move out of the meditation slowly, taking your time, and move through the rest of your day with a more positive outlook.
Contact me for information on individually tailored breath coaching and yoga available online: lavieenyoga@gmail.com
How we stand, and how we engage our feet with the earth informs and responds to our fundamental interior attitude. Do you step into a room tentatively like a you’re worried about intruding? Or do you step like someone with a right to be there? Doit dans ses bottes (right in your boots) as the French saying goes. Do you walk lazily with a lack of direction or do you walk confidently with purpose? This 5 minute exercise will tell you a lot about how you hold yourself in space.
The practice of yoga increases proprioception (also called kineasthesia)‑‑the awareness of position, movement, force, and effort of the body in space. The greater our proprioception, the more we are able to conduct our bodies in ways that keep us injury-free, balanced and resilient. Proprioception is also key to the conservation of energy which lies at the heart of any yoga practice. It is sometimes called ‘the sixth sense’ the implications of which become increasingly apparent as we deepen our practice.
A great place to begin to increase our powers of proprioception is with the feet, since the placement of our feet affects our entire body, from our knees to the pelvis and spine, all the way up to the neck and head. When we wear closed shoes, or even socks, we block our ability to develop this awareness, so I highly recommend that you practice barefoot. First of all, discover your own habitual foot stance with the following exercise.
Stand tall but not stiff, arms relaxed to the sides, with a lifted straight spine. Don’t bend or lock the knees because this turns off the core and hip muscles. Your feet can be together or slightly apart but make sure that the toes of both feet are in line. Bring your awareness to your feet. Roll them a little inwards onto the inner arches and then outwards onto the outer arches a few times. What feels more natural? What do you notice?
Now bring the weight back into your heels as far as you can while keeping the toes on the floor, and then forward towards the balls of the feet keeping your heels down. Again, check what feels more natural to you and what you notice happening in the legs, hips and back. Place most of your weight on the heels and notice how you lose the natural curve of the lumbar spine and the core muscles become disengaged. This is how most people stand.
Now lean forward onto the balls of the feet and notice how the increased pressure on the lumbar forces it to curve more and the core muscles engage. Standing on the inner feet will internally rotate the hips, which can, over time, lead to ‘knock-knees’. Standing more on your outer feet will strain the outer knees and can lead to bowed legs. Place your fingers gently across the hip bones and roll the feet first to the outside and then to the inside and feel the external and internal rotation of the hips as you do so. Notice how even a small adjustment of the feet affects the position of the hips.
Now take a few moments to divide your weight evenly between the heels and the balls, then between the inner and outer arches. Gently spread and then lengthen the metatarsals by spreading and lengthening the toes. Press your toes firmly down and grip them a little. The toe gripping is a temporary step to help you to connect with the next part of the practice.
Now lift up through the inner arches of your feet keeping the three points of the triangle of each foot (the two ends of the transverse arch across the balls of the feet and the heel) on the floor. Feel a suction lifting sensation right in the centre of the foot. You can imagine your feet like two toilet plungers creating a suction on the ground (excuse the image!) Feel how the lift of inner arches travels all the way into the inner ankles. You might notice a subtle lift of the thighs and the backs of the calves as well.
Now, relax the grip of the toes without lose the lift around the central point of the suction. This takes a bit more concentration and effort, but it will be worth your while. Engage the legs and ankles to maintain this lift in the arches. This is pada bandha or ‘foot lock’ in classical yoga. It enables the yogi to draw prana (vital energy) up through the ground.
Now, walk around the room for a minute or two while trying to retain all the following points:
1. The weight of each foot spread evenly between the upside down triangle made by either side of the transverse arch and the heel connected through the inner medial arch and the outer lateral arch.
2. Maintain a lift of the inner medial arch of both feet
3. Spread the toes apart
4. Feel a suction and lift at the very centre of the foot
With a bit of practice you can develop your “Yoga Foot”, heighten the sensory feedback through your entire nervous system, get that prana flowing more freely and learn how to hold your ground. Literally!
We all suffer from occasional bouts of procrastination, especially when it comes to something that’s actually good for us. (Go figure).We don’t tend to procrastinate about that third glass of wine, or flopping in front of Netflix for the evening, but we do put off going for a bike ride, changing our diet, or yes, doing our yoga practice. There are still days (though they are becoming fewer and fewer) that I don’t do yoga. And, of course, there is always a great reason. So, this month, I thought I’d make a list of TEN REASONS NOT TO DO YOGA TODAY.
I’m sure many of you will recognize some of these and can add your own favourites to anything that you procrastinate about in your life!
1. I’M TOO TIRED. Yoga gives us energy and vitality. Also, it’s highly unlikely that we will feel less tired as the day goes on. Try it and see.
2. I’M TOO BUSY. I’LL DO IT LATER. Funny how that ‘later’ never seems to happen no matter how well-intentioned we are. Being busy means keeping our priorities straight. We are actually more efficient with the things we have to do when we spend time to do our practice because we feel better while we’re doing them!
3. I HAVE TO CLEAN THE HOUSE. This one’s a personal favourite. Obviously, the house cleaning police are going to ring the doorbell at any moment and demand an on-site inspection! Anyway, if you clean your house after a spot of yoga, you’ll have more energy and enthusiasm for it.
4. I DON’T HAVE A YOGA ROUTINE. Get one! There are several yoga teachers in the Deux-Sévres who, like me, would be happy to work with you to develop a personal daily practice.
5. I DON’T HAVE SPACE TO DO YOGA. So make one! You only need somewhere the size of your yoga mat. And, as the weather starts improving, consider doing your yoga outside. It is even more beneficial to do yoga in nature.
6. YOGA IS FOR SKINNY PEOPLE. This is one of the biggest misconceptions and is driven in large part by yoga types who emphasize a physical stereotype of the ‘ideal’ yoga practitioner. Actually many of the ancient yogis of India were quite tubby! And in any case, yoga helps to improve your digestion and regulate metabolism which will help to balance your body to keep the weight off.
7. I’M TOO OLD. I began teaching yoga at the age of 53. A yoga teacher recently died at the age of 101. She was teaching almost to the end. End of argument.
8. WHAT IF I HURT MYSELF? You are more likely to hurt yourself cleaning the stairs or leaning over the bathtub without preparing your body fist? Doing yoga under guidance will increase your body-awareness which will, in turn, protect you from injury as you go about your daily routine.
9. I’M NOT FLEXIBLE. No one is flexible at every part of their body. Yoga is not gymnastics. Flexibility is over-emphasized because of the images of extreme yoga postures that we see as examples of the ideal yoga students. Flexibility is just one part of the many benefits of yoga, which include improved strength, endurance, resilience, balance and body awareness.
10. I NEED TO TAKE CARE OF SOMEONE ELSE. Whether a spouse, kids, grand-kids, friend or animals, if you take care of yourself, you will be in such a better state of both mind and body to take care of someone else. Even 15 minutes will make a difference.
FEEL FREE TO ADD: It’s too hot, it’s too cold, my yoga pants are in the wash, and my dog ate my yoga mat!
In truth, we all need a break now and then, even from yoga. But there is a difference between a conscious break and an excuse. Because whatever your reason for not doing yoga today, it will stop making sense the moment you step onto your mat and you remember why you were there in the first place.
My yoga teacher and good friend, Surinder Singh ji of Swasti Yogashala, Rishikesh, is not fluent in English, but somehow, the fact that he is forced to keep to a simple vocabulary, helps to drive home the salient points of his teachings with a straightforward clarity that often gets lost in the kind of lecturing style that some teachers adopt. But one thing that I heard him say every day of our training had me a bit perplexed. “You are doing better and better, every day in every way.” This was, as far as I was concerned, demonstrably untrue.
Even back then at the start of my yoga journey, some days I could perform the tree without a wobble, other days I felt like a drunk on a skating rink. Some days I could hold the camel pose for a full minute, other days I’d collapse into a heap after only 30 seconds. Certain mornings could be so dramatically different from the previous one often with no clear rhyme or reason. Was it the gluten in the pizza I’d had for dinner? Had I slept funny? You realize after a while that on some days, well, things just don’t work as well, and the body is no exception. But there he went, my dear Surinder ji, every day the same mantra “You are doing better and better.” What on earth was he on about? I was beginning to think there was something wrong with him.
Fast forward to a full two years later, when Surinder ji began offering lessons via Zoom because of the pandemic. It was so lovely to see him again. I had missed him terribly and particularly that bond of respect and trust that comes with working with someone over a long period of time. But at the end of the lesson, there he went again with the you are doing better and better every day. And then it hit me.
He wasn’t saying that every day the nuts and bolts of your yoga practice is going to improve. He was saying that we are always becoming a better student of yoga. And that includes learning to accept the days when our thighs wobble or our shoulders stiffen, or we just feel tired or unmotivated or frustrated or irritated. It means getting better at not regarding every development (good or bad) as a trend. It means getting better at doing things when you just don’t feel like doing them, not doing them when you simply can’t, and understanding the difference. It means getting better at being honest with where you are at any point in time. It means getting better at enjoying when you improve and having patience when you don’t. It means getting better at befriending impermanence and imperfection. In short, It means getting better at responding to whatever comes up in the moment. Oh, I thought, in that ‘it’s been staring in your face the whole time’ kind of way, that’s what he means! And now, like the Beatles song goes, “It’s getting better all the time.”
As the Winter is firming its grip upon those of us in the Northern Hemisphere, I find myself contemplating the centrality of the sun in our lives. How all life, animal and vegetable, depend upon it. How it provides us with Vitamin D for healthy bones and resistance to respiratory illnesses, and now the growing evidence that the sun improves the health of our heart and even lowers blood pressure. And then there is that whole soul-to-toe gratitude we can feel in its presence that sometimes borders on bliss, especially when we’ve been deprived of the warmth and caress of sunlight for long periods of time.
Surya Namaskar (Sun Salutation) is the perfect yoga sequence to add to any morning routine, or to do on its own. It involves a flow of forward and backward bends together with hip and shoulder openers. It’s a sequence that engages the entire body, both the right and left sides in equal measure. It can be performed at various speeds in a flow of balanced movement, offering the same time to each posture. Traditionally, it is performed at dawn facing an easterly direction, but if this isn’t possible, you can imagine the rising sun in your mind’s eye.
At the start and end of each round, we perform ‘namaskar mudra’ — bringing the hands together with the backs of the thumbs gently pressing the sternum at the location of the heart (Skt. anahata) chakra. Anahata translates, poignantly, to ‘unhurt’. This in itself is worth a few moments of reflection. The mudra is a tactile reminder of our deeper identity. Just as the sun is the heart of our solar system, the heart—not the brain—is where eastern wisdom traditions place the seat of the mind as the centre of our conscious experience. The mudra is also a reminder of the powerful connection between the sun and the heart that wisdom traditions have long known about and cardiovascular clinicians are presently discovering.
Some say that Surya Namaskar originated two and a half millennia ago, but as tempting as it is to evoke ancient mystical origins, this seems rather doubtful. The sequence is not mentioned in any text on Hatha Yoga, nor in the ancient Vedic texts, not even by Patanjali, considered the father of yoga and the author of the Yoga Sutras. As much as it might be tempting to mystify its origins, it appears that Surya Namaskar, at least as we know it today, was developed as a military exercise as late as the 17th century as part of physical preparedness training for the army of a powerful Indian warrior-king named Shivaji Bhonsle I (pronounced bhoh-slai). Yoga actually fell out of fashion in India in the modern era, but since 2016 the Indian army has begun incorporating Surya Namaskar this sequence into its training exercises.
There is a meditative effect that you can experience on your own as you deepen the practice. Coordinating the movements with the breath activates the regulatory capacities of the nervous system. Delicate, slow, conscious nasal breathing, especially exhales, calms the mind by shifting awareness from the external to the internal landscape. Each posture counter-balances the preceding one, so that the distribution pattern of load bearing on the limbs ensures that none of the joints are over-stressed. A common practice sequence is 3 full rounds, which means 6 half rounds, but even one full round will make you feel more alert and more ready to face the day. Different yoga traditions teach different variations of this sequence and if you search on Youtube you can surely find a sequence that feels right for you. In this way, you can keep a little sun within you even during the dark days.


 One Sunday morning, I got up out of bed and felt a groaning ache radiating from my lumbar region, around the hips and down the outside of my left thigh. Fast forward to ten days later, and I am now an ecstatic 90% better! I’m writing this blog post to let you know how I self-diagnosed my problem and learned to heal in only 10 days.
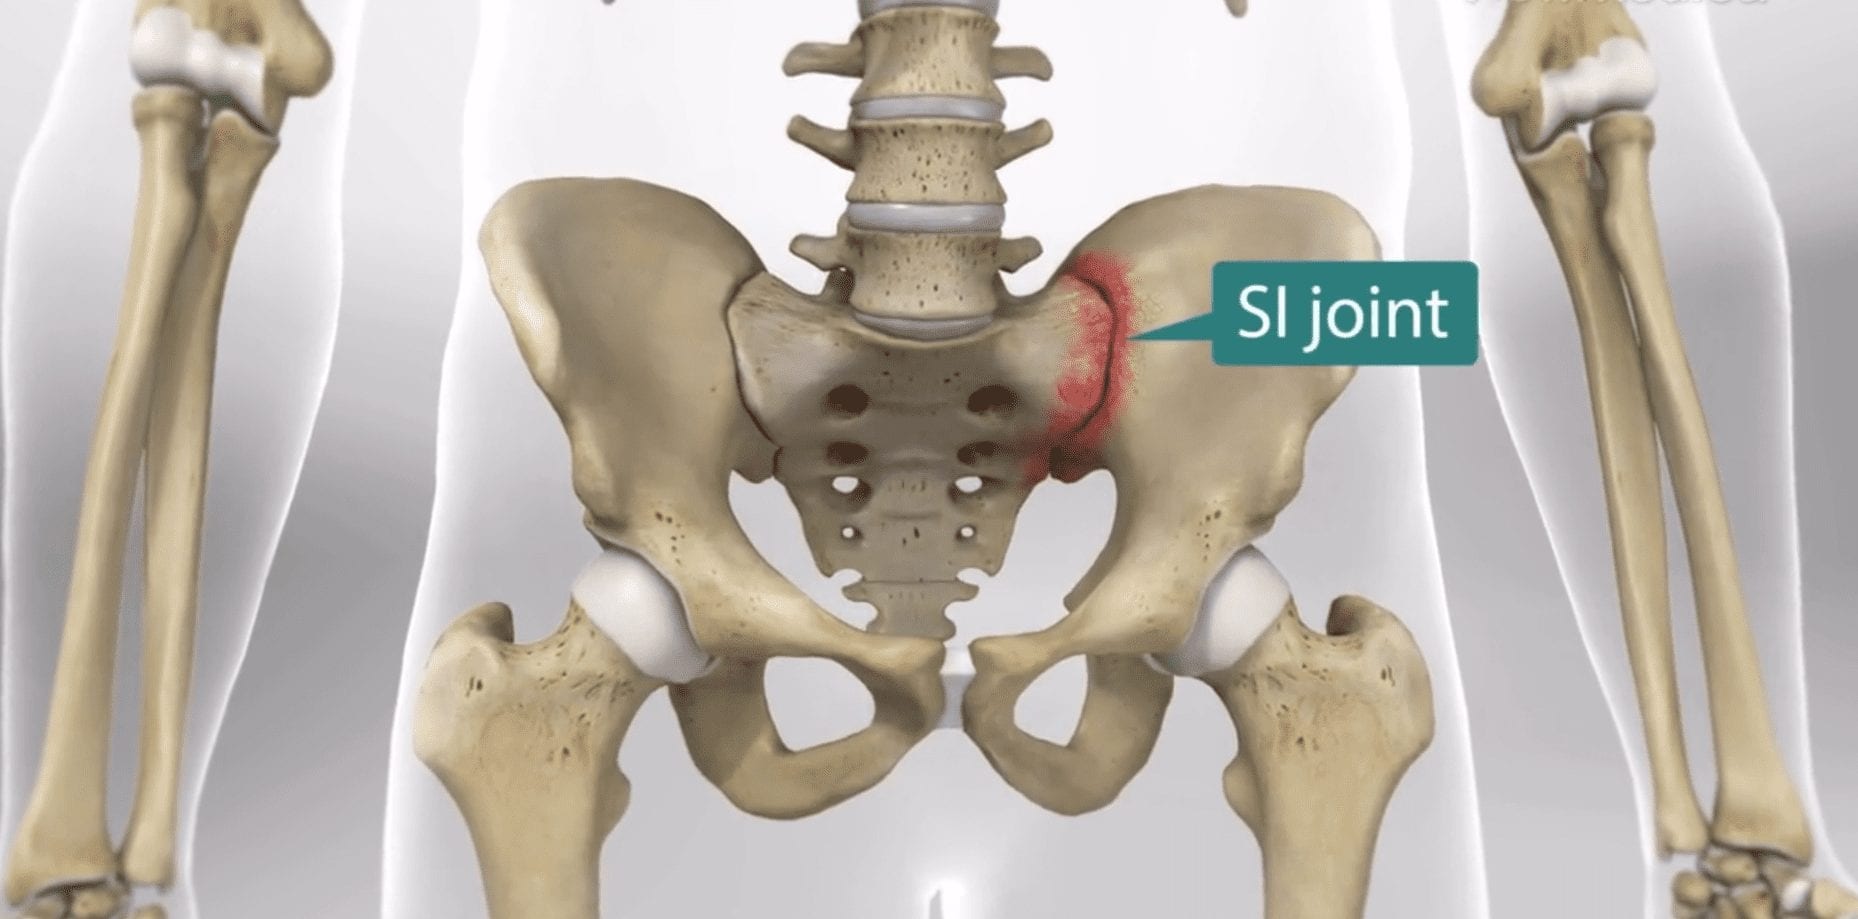


 Now lift up through the inner arches of your feet keeping the three points of the triangle of each foot (the two ends of the transverse arch across the balls of the feet and the heel) on the floor. Feel a suction lifting sensation right in the centre of the foot. You can imagine your feet like two toilet plungers creating a suction on the ground (excuse the image!) Feel how the lift of inner arches travels all the way into the inner ankles. You might notice a subtle lift of the thighs and the backs of the calves as well.